Detailed documentation about all features and settings of Contact Form to Email .
From the dashboard/configuration area the process is as follows:
From the end user (visitor) point of view, the process is as follows:
To install the WordPress plugin follow these steps:

After going to the WordPress administration menu >> Settings >> Contact Form to Email you will see the list of forms like in the following image:
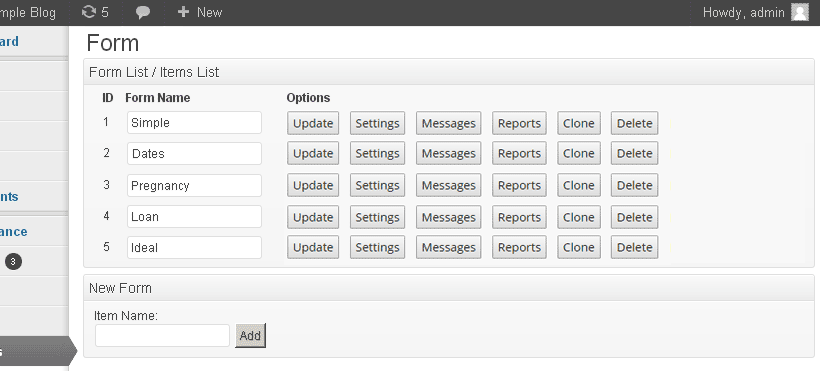
For each form you will see the following options:
After clicking the "Settings" button you will jump to a new page with the form builder a other configuration options as explained below.
The report features are for providing automatic reports of the form usage and data entered into the form. This includes printable messages list with filter options, reports of daily submissions and accumulative hourly report, printable reports for specific fields into the form, emails with the latest submissions and other features that helps you to understand your data.
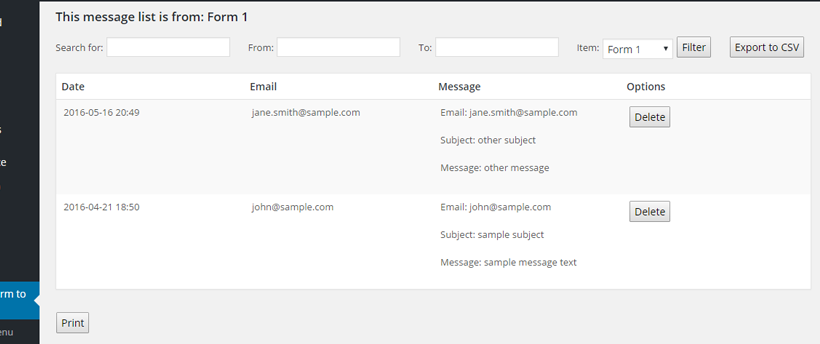
Press the "Messages" button, corresponding to the form. The printable messages screen displays the list of submissions, and a filtering section to reduce the submissions by form, a time interval, or a text in the data
From the messages screen it is possible remove a submission, but from this screen is possible export all submissions to a CSV file

For exporting the submitted information to a CSV file, press the "Messages" button corresponding to the form, and press the "Export to CSV" button, select the location where will be saved the CSV and that's all. The first row of CSV file allows identify each of fields, the text used to identify the field will be the short label, defined in the field, or the label in case that the short label is not defined.
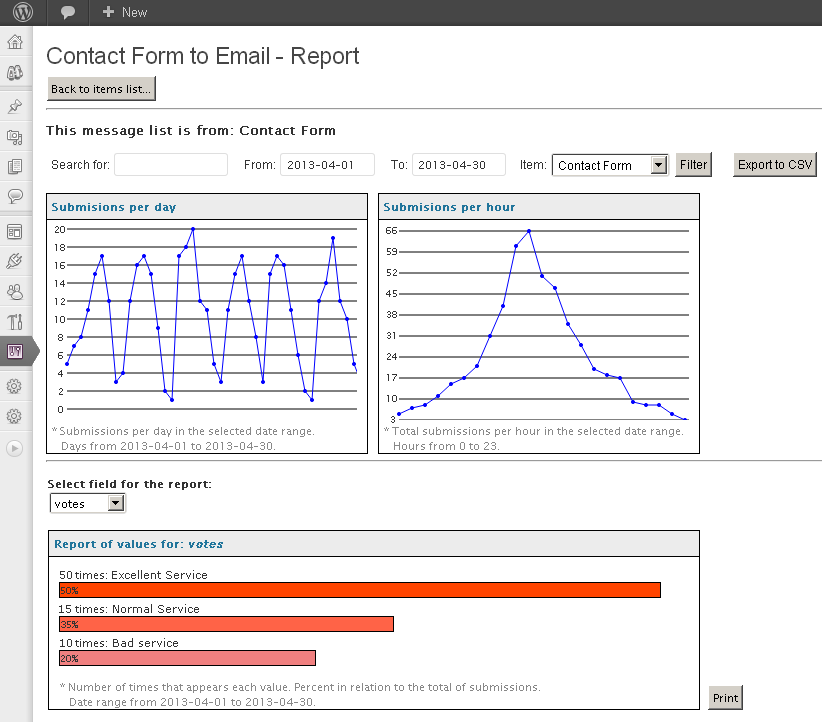
The reports section lets you analyzing the use of the forms and the data entered into them. The first section of the reports is a filter section similar to the one that appears in the messages list page (explained above).
Below the filters section there are three report graphics:
A print button at the end of the page can be used to print the report of the values for the selected field in a printer-friendly format.
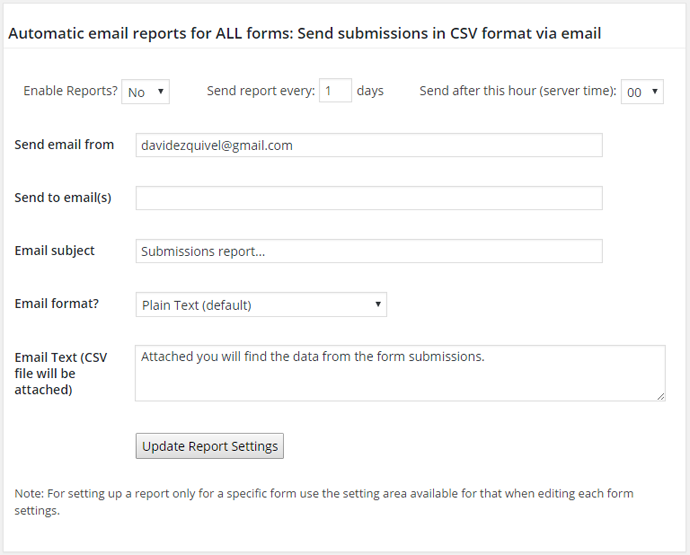
The global email reports can be setup below the list of forms. This report sends a report with the new submissions of all forms every the specified number of days.
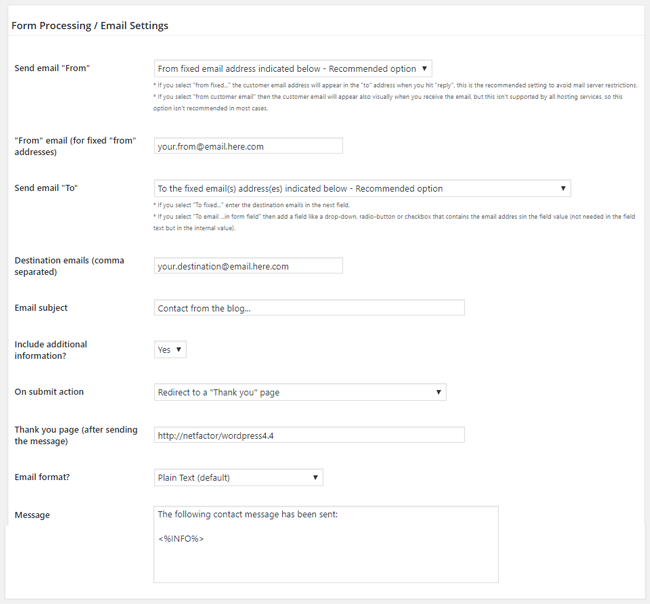
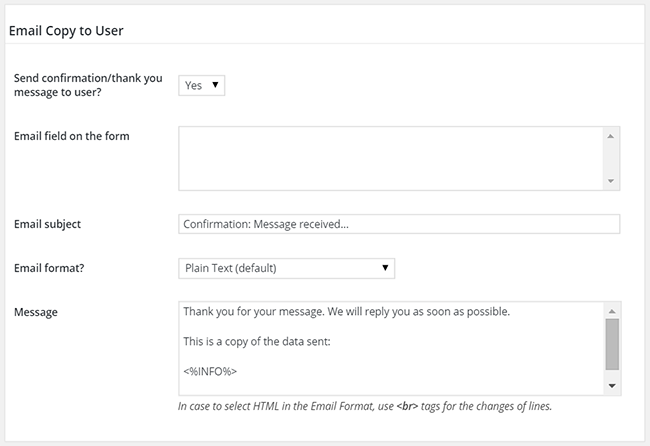
The reports are attached in a CSV / Excel file into the emails. The settings for the email reports (both the global and per form reports) include the following configuration fields:
The reports for each form are very similar to the Global Email Reports but in this case can be setup on the settings page of each form and allowing to have different report settings for each form. This report sends a report with the new submissions of the related form every the specified number of days. The configuration fields and format is the same used for the Global Email Reports.
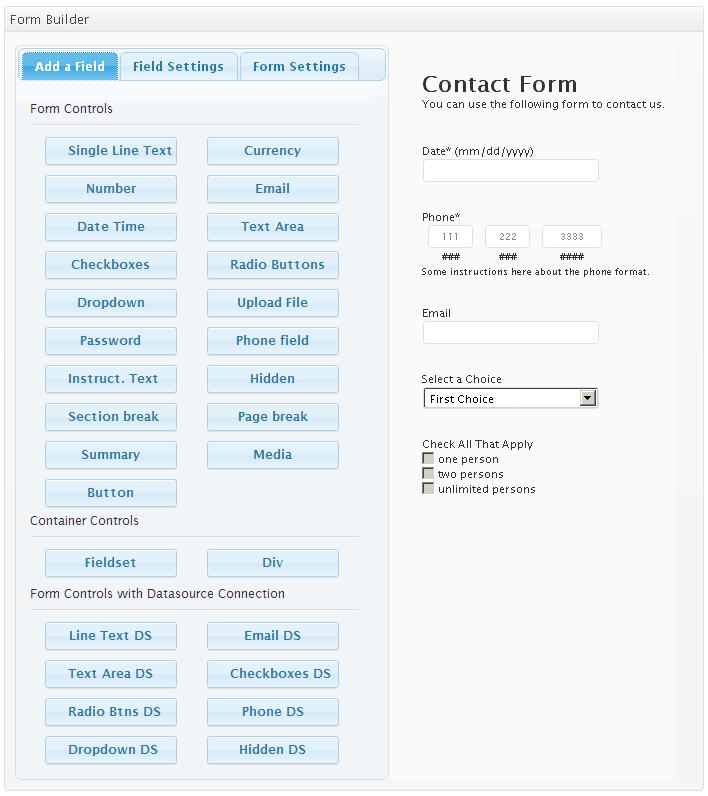
The Form Builder lets you to add/edit/remove fields into the form and also to specify the validation rules for your form (required fields, email fields, etc...).
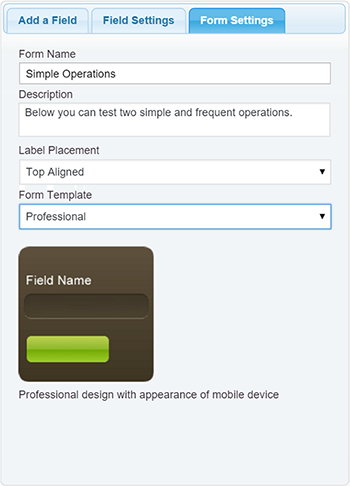
The "Form Settings" tab allows define the form's title and description, as the placement of labels respect the fields (at top, at left, aligned to the right). In the "Form Settings" tab is possible to decide the form's design. The plugin includes multiple predefined designs.
The form builder includes some container controls. The container controls allow to insert another controls in them:
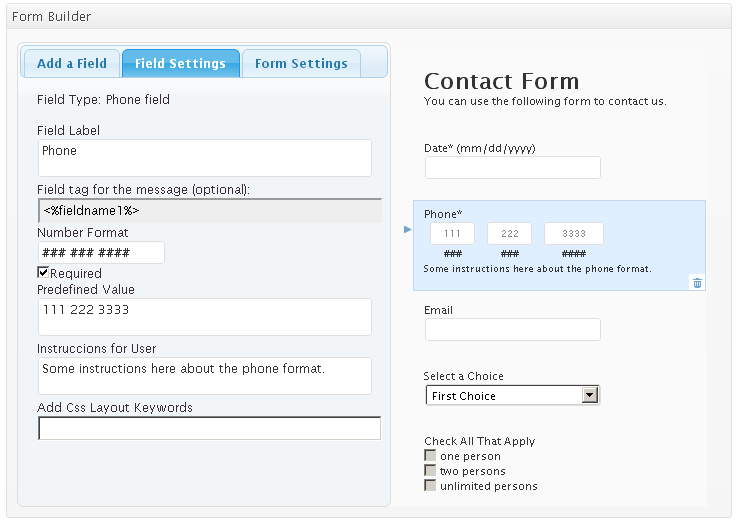
When you click a field already added, you can edit its details and validation rules. The following properties are useful:
This is a step by step about the use of datasource controls
There are different datasources: Database, CSV file, Post Type, Taxonomy, and User Data.
Note: Depending of control selected will be available all available datasources, or not.
So, suppose we want populate the field with the data stored in a database table.
Note: If the database is the same used by WordPress, leave empty the fields above.
Now its time to define the query to database
If your query is very complex, and you prefer create it manually; selects the option "Custom Query", but in this case you should type all the query. Pay attention because you should use alias in the "SELECT" clause, to indicate the colum used to get the values, and the column used to get the texts. For example, a hypothetical query:
SELECT column1 AS value, column2 AS text FROM tablename WHERE column3 > 5 ORDER BY column2 ASC LIMIT 5
The use of database as datasource, allows filtering the information to populate the fields with the values on other fields in the form, or javascript variable. The use of variables are only accepted in the "Condition" section ("WHERE" clause), and requires the format: <%varname%>. For example, to get the title of a post, filtering by its ID, if the id is defined through the fieldname3 field, the "Condition" attribute of the query would be: ID=<%fieldname3%>
The CSV files can be used as data sources for fields with multiple choices (DropDown DS, Radio Btns DS, Checkboxes DS). The initial steps are similar to the previous section, but selecting the "CSV" option as data-source instead of selecting "Database".
A comma-separated values (CSV) file stores tabular data (numbers and text) in plain text. Each line of the file is a data record. Each record consists of one or more fields, separated by commas. The use of the comma as a field separator is the source of the name for this file format.
For CSV files, the plugin includes the attributes:
Select CSV file: file field to select the CSV file.
Use headline: tick the checkbox if the first line of CSV file is a headline to identify the data in the next records.
Delimiter: enter the delimiter symbol used as the field separator on each record.
Press the "Import CSV" button to import the records into the form. This action will feed the lists "Select column for texts" and "Select column for values", that are used for selecting which fields will be used texts and values of the choices in the DS field.
Some fields, like radio groups, checkboxes and drop-down menu, allow dependencies in function to the option selected.
For example, suppose your form includes a radio-group control with multiple choices: - House, - Car, - Electrodomestics, and each of them, uses different attributes. The house requires fields for address, number of rooms, etc; the car requires a field for trademark, model, etc. and finally the electrodomestics, will need type of electrodomestic,and more. So, if you want display the fields, depending of choice selected:
For each form you will be able to edit the following settings:
Form Builder: Already explained in the previous sections (see above).

This area contains the "texts" used for the validations. You can easily translate them to other languages.
Integration with payments gateways is available in the commercial versions of the plugin. The "Payments Integration Settings" section on that version of the plugin allows to setup the global payment settings (price, product name,...). To enable a specific payment method you should enable the related add-on.
The same form can be connected to multiple payment gateways at the same time, in that case the user will see a radio-button group to select which payment method prefers to complete the submission. With payments enabled the notification and confirmation emails are sent after completing the payment.
The following sections explain the different payment gateway integrations available in the plugin.
This addon links the booking form to a PayPal Standard payment process. After the submission the user is redirected to the PayPal Standard payment page to complete the payment. The settings fields are:
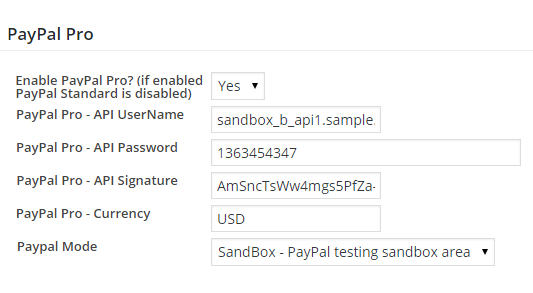
With Payment Form for PayPal Pro you can insert a form into a WordPress website and use it to process credit card payments directly into your website without navigating to an external payment page.
You can check the differences betwen PayPal Pro and PayPal Standard at https://www.paypal.com/webapps/mpp/compare-business-products
For integrating PayPal Pro you must have a PayPal Pro account. In addition to that a SSL connection is also needed, the SSL connection isn't a technical requirement since the plugin can work without it but anyway it is strongly recommended for accepting credit cards into your website, otherwise the transactions won't be secure.
In the settings area the following information is needed to activate and link the PayPal Pro account to the form:
When enabled, the form on the public website will display an additional set of fields to request the data needed to process the payment, like for example the billing address, credit card details. This info is only for the payment processing, as mentioned it won't be stored into the website for security reasons.
After the submission Once the payment is processed and the posted data (excluding the credit card related information) is saved into the WordPress database.

The Authorize.net Server Server Integration Method (Authorize.net SIM) is a hosted payment processing solution that handles all of the steps in processing a transaction, including:
Authorize.net SIM is an ideal integration solution because merchants are not required to collect, transmit, or store sensitive cardholder information to process transactions. Additionally, Authorize.net SIM does not require merchants to purchase and install a SSL or TLS digital certificate, reducing the complexity of securely handling and storing cardholder information, simplifying compliance with the Payment Card Industry (PCI) Data Security Standard. For more information go to www.authorize.net
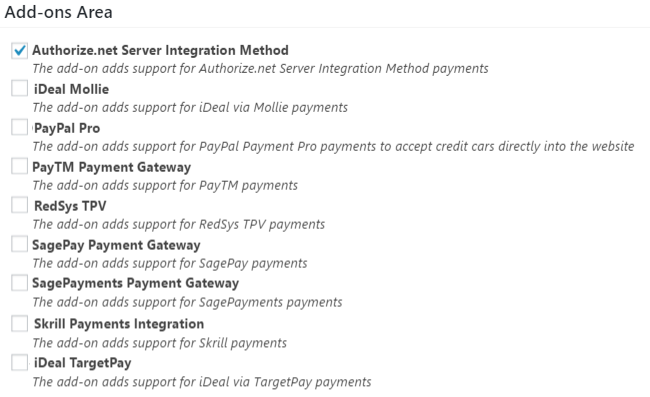
To activate the add-on, simply visit the plugin page through the menu option: "Settings/Contact Form to Email", tick the checkbox: "Authorize.net Server Integration Method", and press the "Activate/Deactivate addons" button
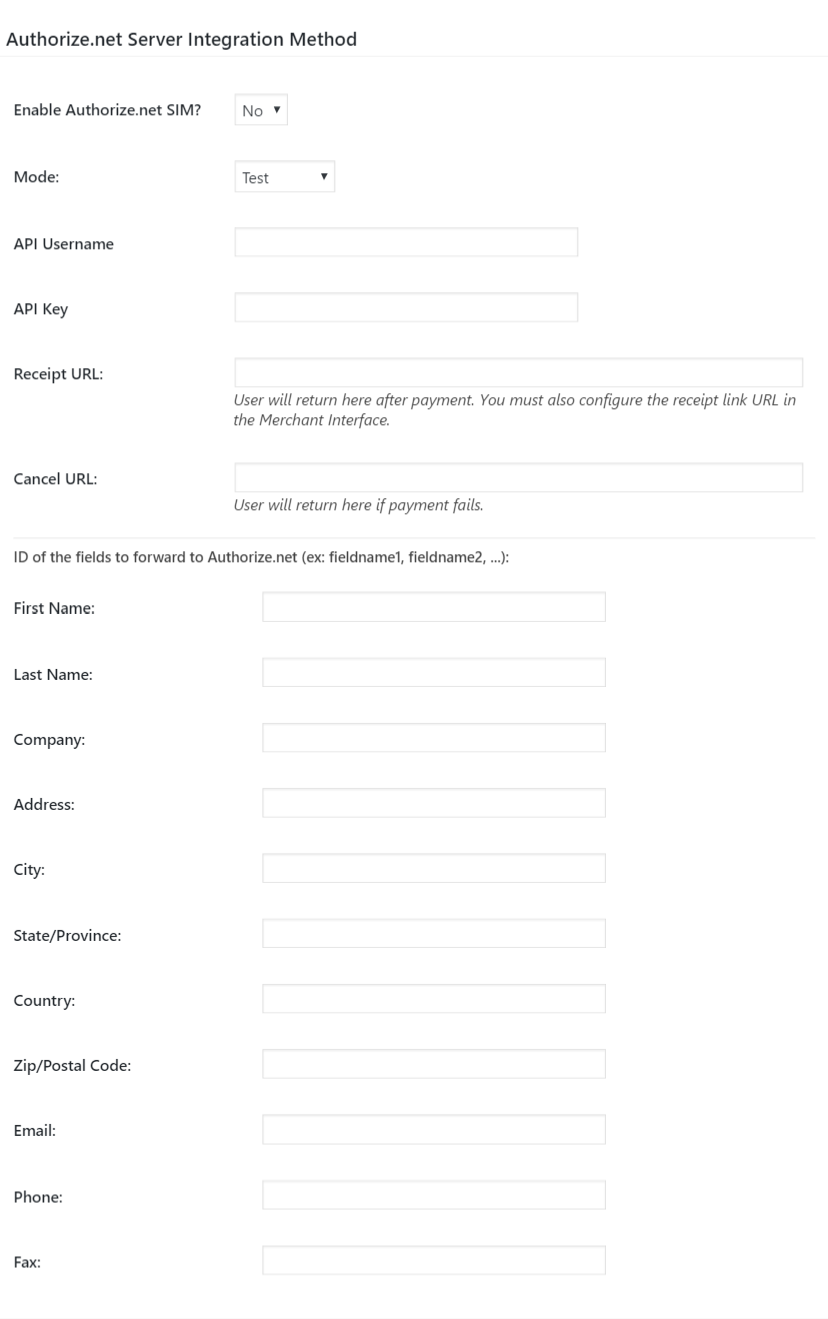
In the settings area the following information is needed to activate and link the Authorize.net Server Integration Method account to the form:
Enable Authorize.net SIM?: Select "Yes" to enable the Authorize.net Server Integration Method payment.
Mode: Change the mode between "test" for testing purposes and "production" for accepting real payments.
API Username: Change this value with API Username received from Authorize.net.
API Key: Change this value with API Key received from Authorize.net.
Receipt URL: User will return here after a successfull payment.
Cancel URL: User will return here if payment fails.
In addition to the above required setting fields there are other fields to link the form fields to the Authorize.net payment form, like for example the client name, address, phone, email, ... These fields are optional. To link the fields you can indicate the ID of the field on the form that contains the related info. Sample values: fieldname1, fieldname2, ..
When enabled, the customer will be redirected to the Authorize.net Server Integration Method payment form after the submision. The process will be similar to the way PayPal Standard works.
![]()
The Stripe Payments addon provides a way to accept all major cards from customers around the world on web. This addon requires SSL on your website to be able to carry the transaction in a secure way. Credit card data is entered directly in the website without navigating to an external page.
To activate the add-on, simply visit the plugin page through the menu option: "Settings/Contact Form to Email", tick the checkbox: "Stripe Payment Integration", and press the "Activate/Deactivate add-ons" button...
In the settings area the following information is needed to activate and link the stripe account to the form:
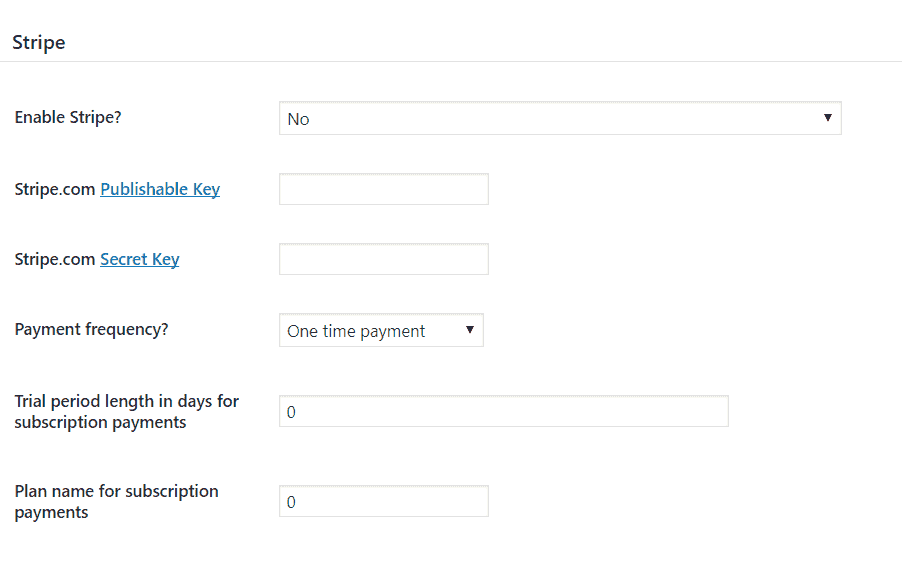
When enabled, after clicking the Contact Form to Email submit button, a Stripe floating panel will be displayed to ask for the credit card data and process the transaction and after that the form submission will continue as usual keeping the customer all the time into your website.

The Skrill Payments addon provides a secure interface for accepting payments through a secure page. You can accept cards, more than 20 local payment methods and over 80 direct bank transfer connections with a single integration. Form more information go to https://www.skrill.com/en/merchants/
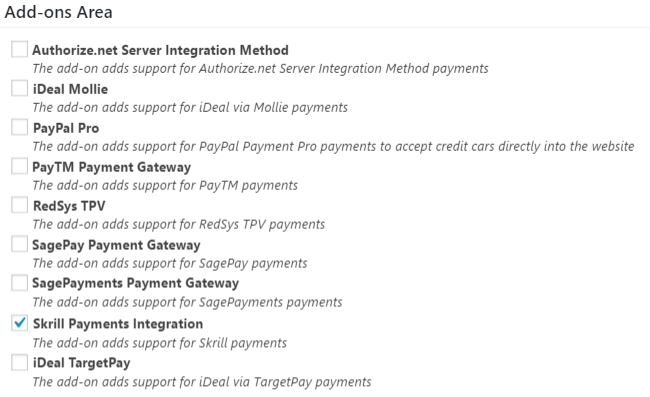
To activate the add-on, simply visit the plugin page through the menu option: "Settings/Contact Form to Email", tick the checkbox: "Skrill Payment Integration", and press the "Activate/Deactivate addons" button.
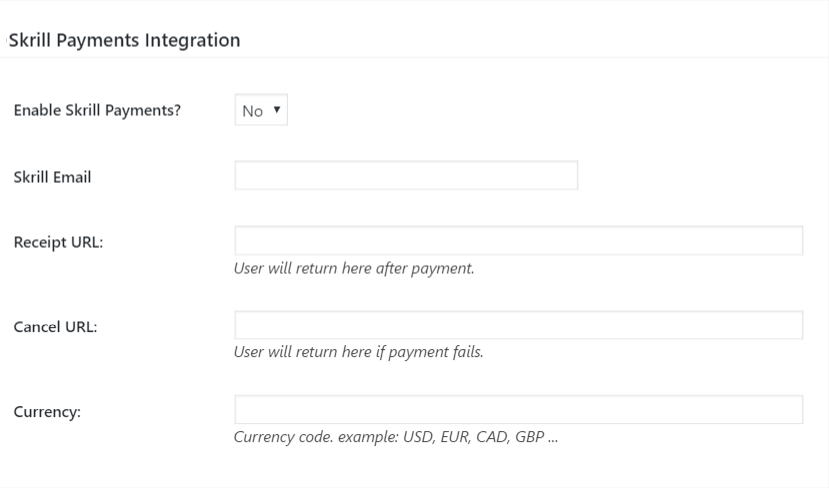
In the settings area the following information is needed to activate and link the Skrill account to the form:
Enable Skrill Payments?: Select "Yes" to enable the Skrill Payments Integration.
Skrill Email?: Emai linked to the Skrill merchant account, this will be the account that will receive the payments.
Receipt URL: User will return here after a successfull payment.
Cancel URL: User will return here if payment fails.
Currency: Currency code for the received payment. example: USD, EUR, CAD, GBP ....
When enabled, the customer will be redirected to the Skrill hosted payment form payment form after the submision. The process will be similar to the way PayPal Standard works.

The TargetPay addon provides integration with iDeal, the most popular Dutch payment method. The integration is made via TargetPay: https://www.targetpay.com/info/ideal?setlang=en
With TargetPay you can set up iDEAL payments for your website easily. Acting as a "Payment Service Provider" it aggregates payments for a large number of webstores. The iDEAL platform combines the online banking systems of 10 of the largest Dutch banks (ABN AMRO, ASN Bank, Bunq, ING, Knab, Rabobank, RegioBank, SNS Bank, Triodos Bank and van Lanschot) into one payment method.
After the consumer selects the iDEAL payment method the consumer's bank is selected. The actual payment then takes place in the bank's trusted online banking environment for which security is guaranteed by the bank. Through iDEAL buyer and seller are guaranteed a transparent transaction without hidden fees or other unpleasant surprises.
To activate the add-on, simply visit the plugin page through the menu option: "Settings/Contact Form to Email", tick the checkbox: "iDeal TargetPay", and press the "Activate/Deactivate Addons" button.
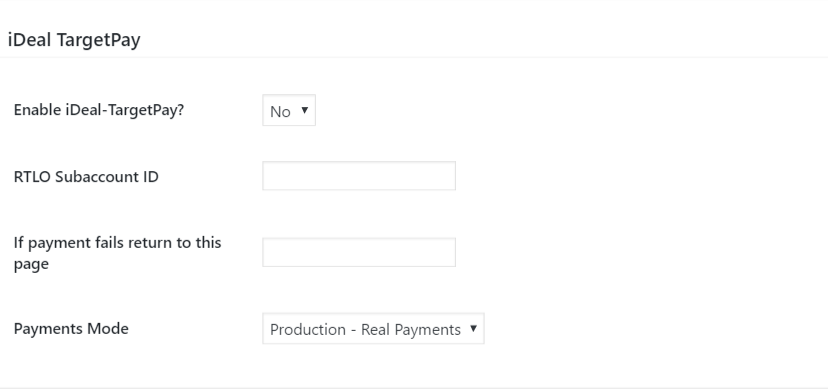
In the settings area the following information is needed to activate and link the iDeal-TargetPay account to the form:
Enable iDeal-TargetPay?: Select "Yes" to enable the iDeal-TargetPay payment option for the form.
RTLO Subaccount ID: Change this value with the account ID received from iDeal-TargetPay.
If payment fails return to this page: Return page if the payment fails or is cancelled before completing it.
Payments Mode: Change the mode between "test" for testing purposes and "production" for accepting real payments.
When enabled, the customer will be redirected to the iDeal-TargetPay payment form after the submision. The process will be similar to the way PayPal Standard works.
![]()
The Mollie addon provides integration with iDeal, the most popular Dutch payment method. The integration is made via Mollie: www.mollie.com.
You're easily connected to iDEAL through Mollie without the dreaded technical and administrative hassle. The iDEAL platform combines the online banking systems of 10 of the largest Dutch banks (ABN AMRO, ASN Bank, Bunq, ING, Knab, Rabobank, RegioBank, SNS Bank, Triodos Bank and van Lanschot) into one payment method.
After the consumer selects the iDEAL payment method the consumer's bank is selected. The actual payment then takes place in the bank's trusted online banking environment for which security is guaranteed by the bank. Through iDEAL buyer and seller are guaranteed a transparent transaction without hidden fees or other unpleasant surprises.
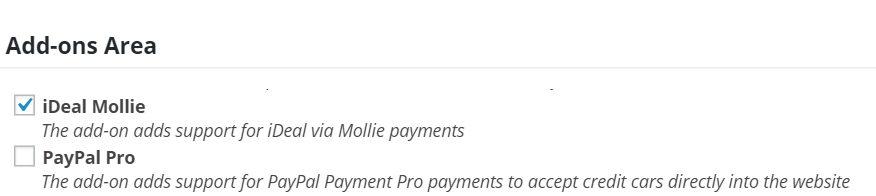
To activate the add-on, simply visit the plugin page through the menu option: "Settings/Contact Form to Email", tick the checkbox: "iDeal Mollie", and press the "Update" button...
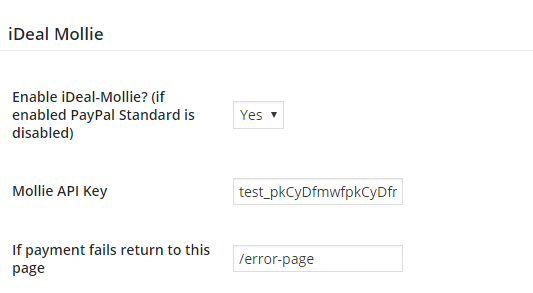
In the settings area the following information is needed to activate and link the Mollie - iDeal account to the form:
Enable iDeal-Mollie?: Select "Yes" to enable the Mollie - iDeal addon.
Mollie API Key: The API Username provided by Mollie for your account, it may be the test key or the production key.
If payment fails return to this page: If the payment fails the customer is redirected to the page indicated in this field.
When enabled, the customer will be redirected to the Mollie - iDeal payment form after the submision. The process will be similar to the way PayPal Standard works.
![]()
The RedSys / Servired / Sermepa addon provides a secure interface for accepting credit card payments through most banks in Spain (Sabadell, Banco Popular, BBVA, Santander, Bankia, Caixa, Bankinter, etc...). You can read more about RedSys at www.redsys.es.
To activate the add-on, simply visit the plugin page through the menu option: "Settings/Contact Form to Email", tick the checkbox: "RedSys TPV", and press the "Update" button...
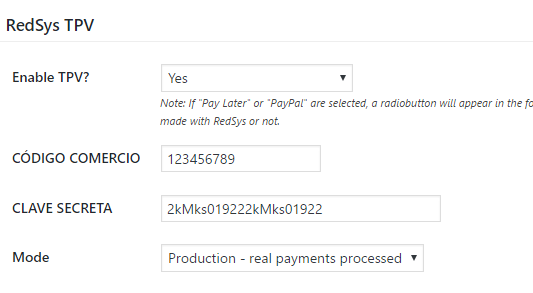
In the settings area the following information is needed to activate and link the RedSys account to the form:
Enable TPV: Select "Yes" to enable the RedSys TPV. If "Pay Later" or "PayPal" are also selected in this option, a radiobutton will appear in the form to select if the payment will be made with RedSys, with PayPal or if the form will be submitted without payment.
CÓDIGO COMERCIO: The API Username provided by RedSys or your bank.
CLAVE SECRETA: The API Password provided by RedSys or your bank.
Mode: Select "Sandbox" for testing purposes and "Production" for charging real payments.
When enabled, the customer will be redirected to the RedSys payment form after the submision. The process will be similar to the way PayPal Standard works.

The SagePay addon provides a secure interface for accepting payments through SagePay. You can read more about SagePay at www.sagepay.co.uk.
To activate the add-on, simply visit the plugin page through the menu option: "Settings/Contact Form to Email", tick the checkbox: "SagePay", and press the "Update" button...
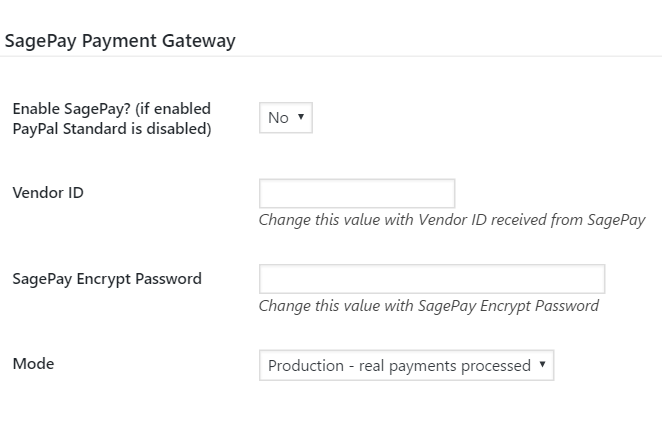
In the settings area the following information is needed to activate and link the SagePay account to the form:
Enable SagePay?: Select "Yes" to enable the SagePay payment gateway.
Vendor ID: The Vendor ID provided by SagePay.
SagePay Encrypt Password: The SagePay Encrypt Password provided by PayTM.
Mode: Select "Sandbox" for testing purposes and "Production" for charging real payments.
When enabled, the customer will be redirected to the SagePay payment form after the submision. The process will be similar to the way PayPal Standard works.

The SagePayments addon provides a secure interface for accepting payments through a secure SSL checkout system for both bankcard and virtual check transactions. All authorized and approved transactions will be delivered into your current bankcard and/or virtual check batches viewable within the Virtual Terminal for order processing and settlement. You can read more about Sage Payment Solutions at http://www.sage.com/us/sage-payment-solutions/accept-payments. The integration implemented in this addon is for Sage Payment Solutions >> Shopping ExpressPay

To activate the add-on, simply visit the plugin page through the menu option: "Settings/Contact Form to Email", "SagePayments Payment Gateway", and press the "Update" button.
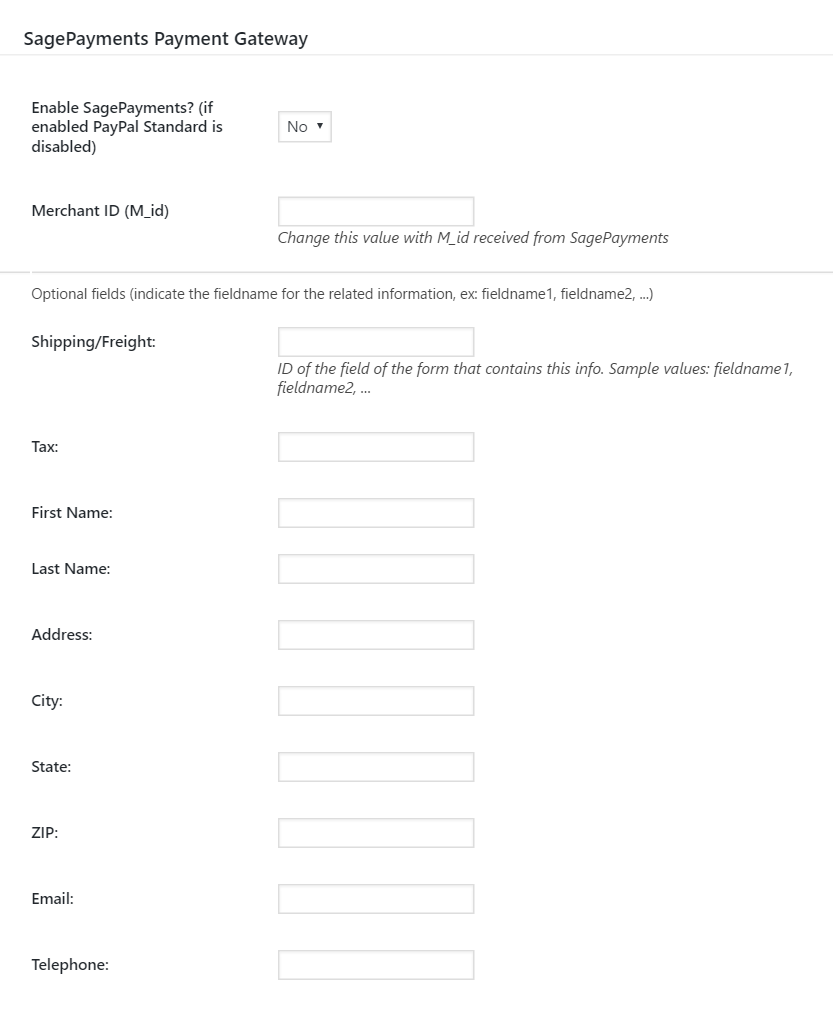
In the settings area the following information is needed to activate and link the Sage Payment Solutions >> Shopping ExpressPay account to the form:
Enable SagePayments?: Select "Yes" to enable the SagePayments TPV.
Merchant ID (M_id): Change this value with M_id received from SagePayments.
In addition to the mentioned two required setting field there are other fields to link the form fields to the Sage Payment Solutions payment form, like for example the client name, address, phone, email, tax and shipping cost. These fields are optionals and to link the fields you can indicate the ID of the field on the form that contains the related info. Sample values: fieldname1, fieldname2, ...
When enabled, the customer will be redirected to the Sage Payment Solutions payment form after the submision. The process will be similar to the way PayPal Standard works.
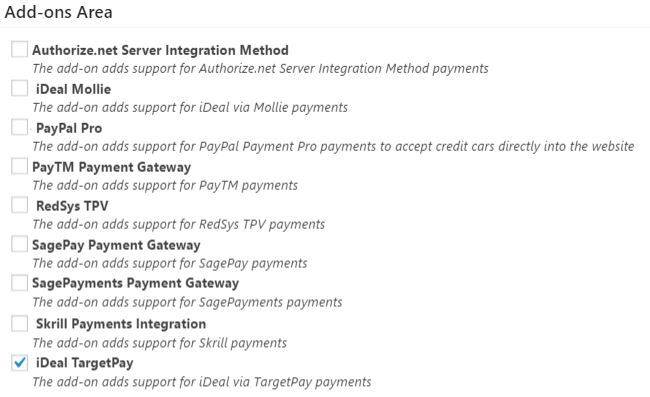
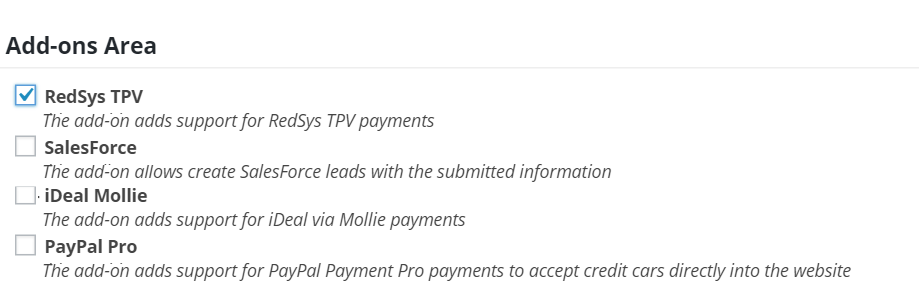
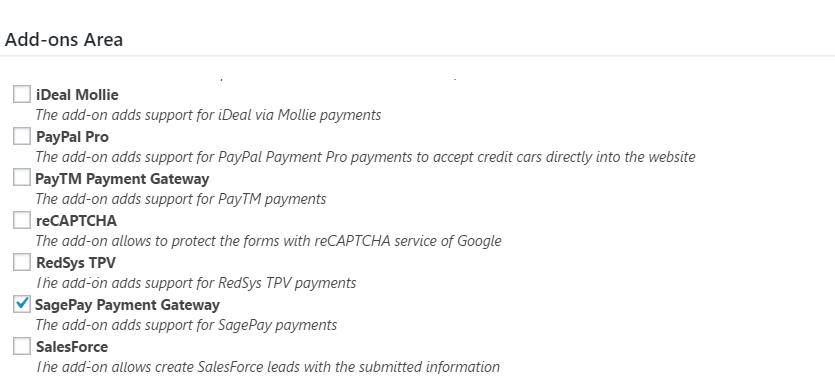
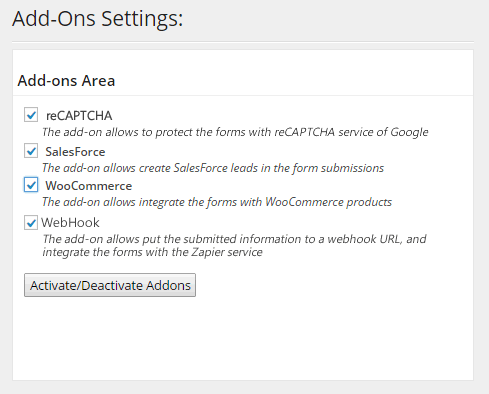
The list of add-ons available in the plugin, appear in the "Add-ons area" of settings page of the plugin. For enabling the add-ons, simply should tick the corresponding checkboxes, and press the "Activate/Deactivate Addons" button.
With iCal addon the users will receive an iCal file as part of the confirmation email after the form submission. The iCal file allows to be imported into most popular calendars like Outlook and Google Calendar.
To activate the new iCal attachment add-on, simply visit the plugin page through the menu option: "Settings/Contact Form to Email", tick the checkbox: "iCal Export Attached", and press the "Activate/Deactivate addons" button.
With the add-on activated go to the form settings page and at the bottom of that page you can configure the iCal file that will be attached into the emails. You will need to specify the ID of the field that contains the date and you can modify the iCal content and time conversion settings if needed.
In the settings area the following information is needed to activate and setup the addon:
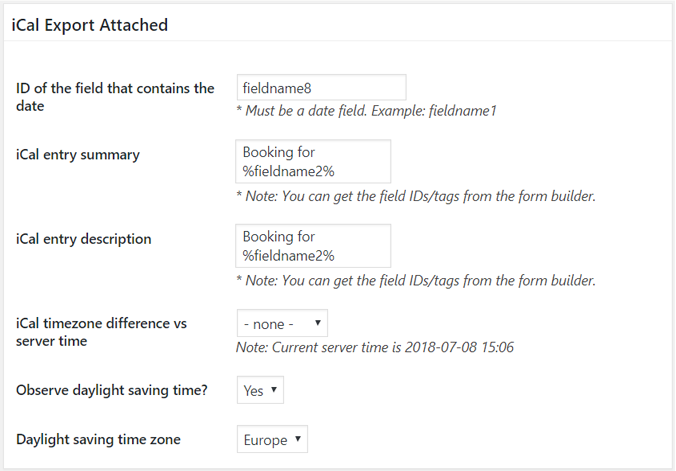
When enabled, after clicking the contact form submit button, an iCal file will be generated and attached to the emails.
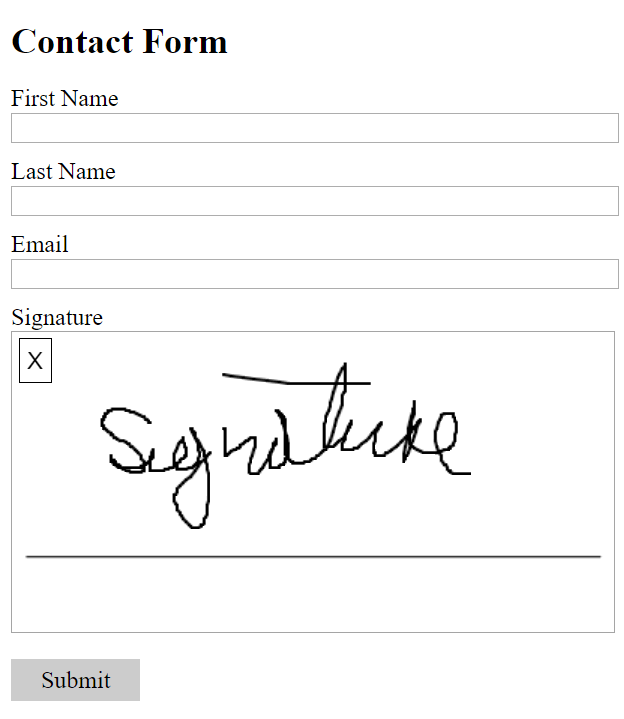
The add-on converts the form fields selected in "Signature" fields, allowing the users to sign with the mouse or directly in the touchscreens.
To activate the add-on, simply visit the plugin page through the menu option: "Settings/Contact Form to Email", tick the checkbox: "Signature", and press the "Update" button.
From the form's settings, selects the fields to convert in Signature fields. It is possible convert multiple fields in the form in signature fields.
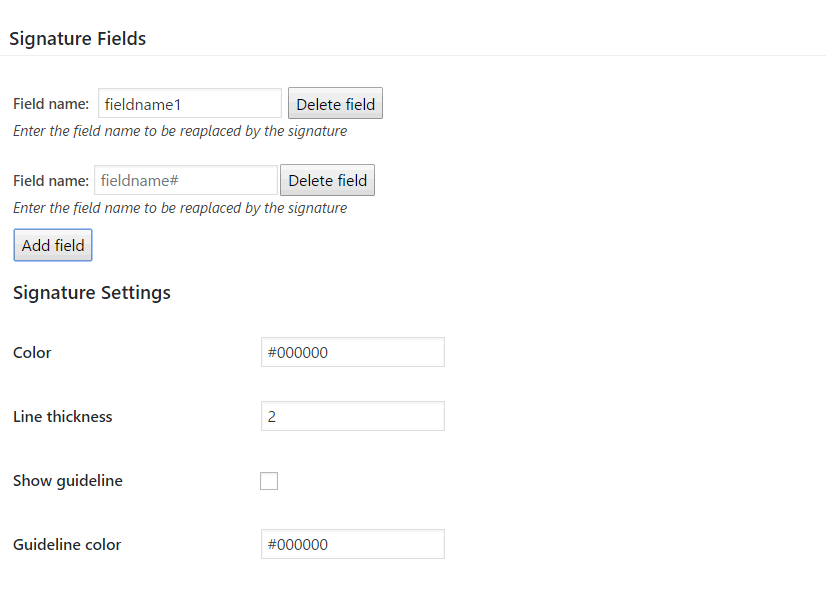
Signature settings:
Color: the color code for signatures. For example: #000000
Line thickness: an integer number defining the line thickness of the signature.
Show guideline: checkbox to include or not a guideline in the signature fields.
Guideline color: the color code for guideline. For example: #000000
![]()
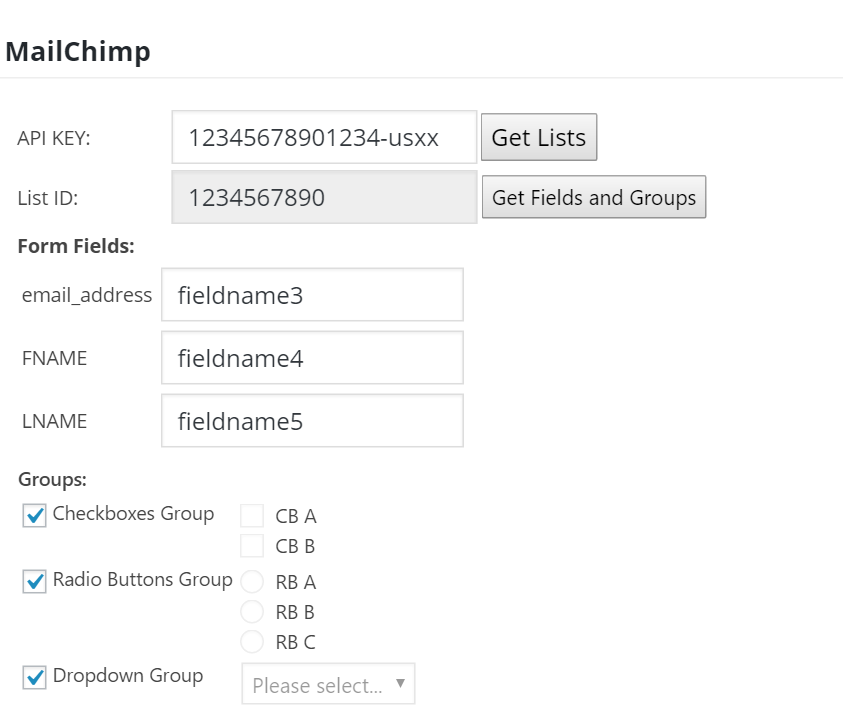
The add-on creates new members in the MailChimp service with the information collected by the forms in the website: www.mailchimp.com.
MailChimp is an online email marketing solution to manage subscribers, send emails, and track results.
* MailChimp is a third party service not related to our company. MailChimp may charge for their service.
To activate the add-on, simply visit the plugin page through the menu option: "Settings/Contact Form to Email", tick the checkbox: "MailChimp", and press the "Update" button...
After activating the MailChimp add-on, the form settings will include a new section to create the correspondence between the signup form associated to a list in MailChimp, and the form fields in the form created with the "Contact Form to Email" plugin.
The add-on integrates the forms with the Twilio service for sending notification messages (SMS) after submit the forms.

* Twilio is a third party service not related to our company. Twilio may charge for their service.
To activate the add-on, simply visit the plugin page through the menu option: "Settings/Contact Form to Email", tick the checkbox: "Twilio", and press the "Activate/Deactivate addons" button...
After activating the Twilio add-on, a new section will be available section in the form's settings for entering the required data.
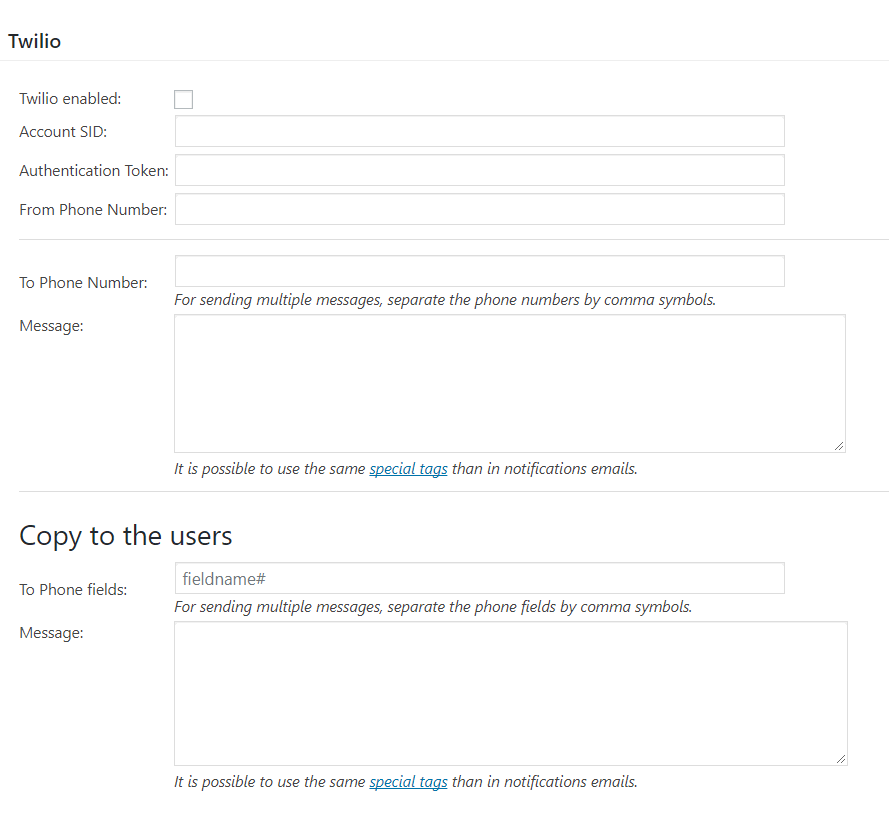
The add-on settings are:
Twilio enabled: for enabling/disabling the integration with the form.
Account SID: enter the Account SID provided by Twilio.
Authentication Token: enter the Authentication Token provided by Twilio.
From Phone Number: enter the phone number used as the "Origin" of SMS (enter a valid phone number including the country code).
To Phone Number: enter the phone numbers (separated by comma symbols) where to send the SMS (enter a valid phone number including the country code).
Message: enter SMS content (it is possible to use the same special tags than in the notification emails).
To Phone fields: enter the names of phone fields inserted in the form (fieldname#, separated by comma symbols).
Message: enter SMS content (it is possible to use the same special tags than in the notification emails).
The add-on integrates the forms with the Clickatell service for sending notification messages (SMS) after submit the forms.

* Clickatell is a third party service not related to our company. Clickatell may charge for their service.
To activate the add-on, simply visit the plugin page through the menu option: "Settings/Contact Form to Email", tick the checkbox: "Clickatell", and press the "Activate/Deactivate addons" button...
After activating the Clickatell add-on, a new section section will be available in the form's settings for entering the required data.
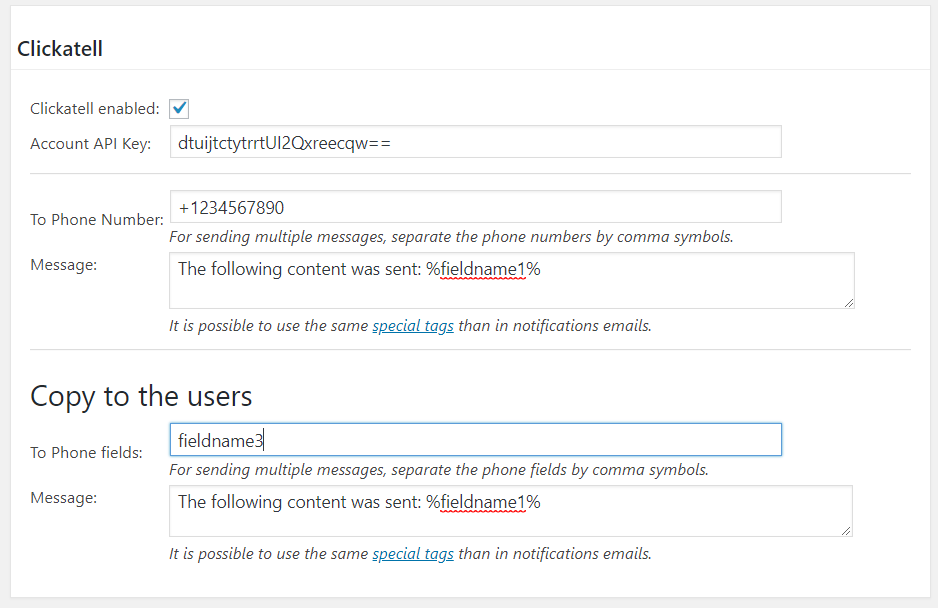
The add-on settings are:
Clickatell enabled: for enabling/disabling the integration with the form.
Account API Key: enter the Account API Key provided by Clickatell.
To Phone Number: enter the phone numbers (separated by comma symbols) where to send the SMS (enter a valid phone number including the country code).
Message: enter SMS content (it is possible to use the same special tags than in the notification emails).
To Phone fields: enter the names of phone fields inserted in the form (fieldname#, separated by comma symbols).
Message: enter SMS content (it is possible to use the same special tags than in the notification emails).
The Payment Calculations add-ons allows to add the number values on dropdowns / checkboxes / radiobuttons to the total price for payments.
How it works: If enabled, any price in the selected checkboxes, radiobuttons and dropdown fields will be added to the above request cost. Prices will be identified if are entered in the format $NNNN.NN, example: $30 , $24.99 and also $1,499.99. Put the same text in both the text and value of the option, the price will be extracted from the text.
For example, you can create a drop-down/select field with these options:
- 1 hour tutoring for $30
- 2 hours tutoring for $60
- 3 hours tutoring for $90
- 4 hours tutoring for $120
After submission the price sent to payment gateway will be the total sum of the selected options.
The User Registration add-on can be used to create user registration forms. With this add-on enabled you can convert any of your forms into a registration form that will create a WordPress user upon the submission.
How it works: Is as simple as enabling the add-on, indicate which of the form fields contain the firstname, lastname, (email will be identified from the email settings) and mark if you want to send also the default email sent by WordPress when a new user is created.
You can also use the form confirmation email to send the access data to the user (default access level will be basic suscriber). The username of the new created user will be the email address and you can use the tag %userinitialpass% into the email content to add the generated access password intot he confirmation email.
The commercial versions of the plugin include the WooCommerce add-on, to integrate the forms created by the "Contact Form to Email" with the WooCommerce products. The add-on inserts an additional metabox in the WooCommerce products, with two settings fields:
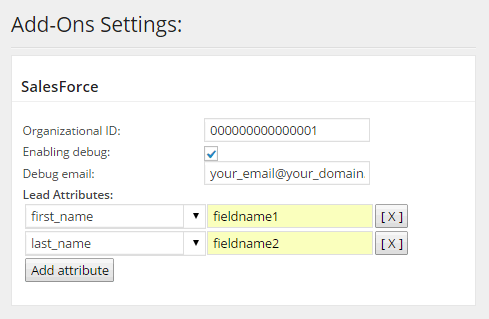
The add-on allows create new leads in the SalesForce account with the data submitted by the forms.
To create new leads in SalesForce with the data submitted by a form, be sure that the SalesForce account has enabled the Web-to-lead option, and then go to the form's settings:
Note: The Add-on includes the list of predefined attributes of Leads, but it is possible to enter custom attributes too.
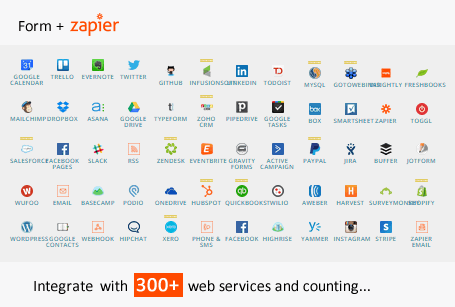
The add-on allows posting the submitted information by the forms to WebHooks URLs. With the WebHook add-on it is possible integrate the forms created by the plugin with services like Zapier. The Zapier connects services as important and popular as Zoho CRM, Dropbox, Mailchimp, Evernote, Google Drive, Facebook, Twitter, and more than 300 services(Zapier apps)
Use this add-on is as simple as entering the WebHooks URLs, through the WebHook section in the forms settings. To associate a form with multiple WebHooks, simply press the "Add new url" button, to add a new input field.
Note: About Zapier service, select Webhook as the Trigger app, and "Catch Hook" as the trigger for this app.
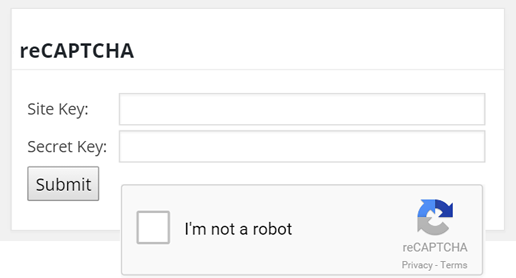
The add-on allows to protect the forms using the Google reCAPTCHA instead of the captcha distributed with the plugin. reCAPTCHA is more visual and intuitive than the traditional captcha, with just a single click the users confirm they are not a robot.
reCAPTCHA (its official name is No CAPTCHA reCAPTCHA) as they define themselves:
reCAPTCHA is a free service that protects your website from spam and abuse. reCAPTCHA uses an advanced risk analysis engine and adaptive CAPTCHAs to keep automated software from engaging in abusive activities on your site. It does this while letting your valid users pass through with ease.
reCAPTCHA offers more than just spam protection. Every time our CAPTCHAs are solved, that human effort helps digitize text, annotate images, and build machine learning datasets. This in turn helps preserve books, improve maps, and solve hard AI problems.
To use reCAPTCHA in your forms, activate the add-on in the the settings page of the plugin, through the menu option: "Settings/Contact Form to Email", tick the checkbox: "reCAPTCHA", and press the "Update" button.
The activation of reCAPTCHA displays a new section for entering the site key, and the secret key, two keys provided by Google reCAPTCHA to protect the website, and validate the forms submissions respectively.
The "Upload Files" add-on allows to add the uploaded files through the forms to the Media Library, and access to them from the pages and posts of website.
Furthermore, it allows to include the support of new mime types, than files format supported by default by WordPress.
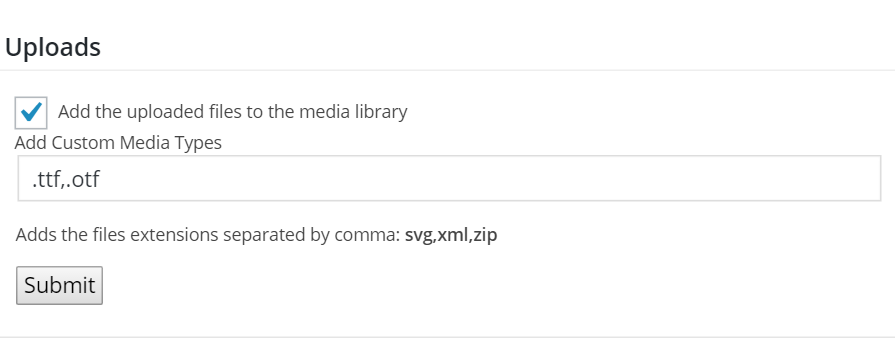
To add the uploaded files to the "Media Library" ticks the checkbox: "Add the uploaded files to the media library".
WordPress supports some specific mime types, for supporting new mime types, you simply should enter the files' extensions separated by comma.
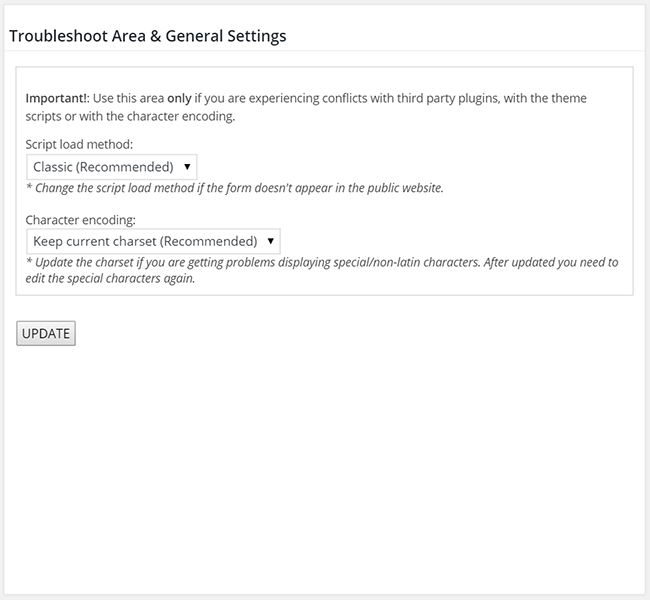
The "Troubleshoot Area & General Settings" section, allows correct some possible issues, or conflicts with third party plugins, and define the general settings.
For printing only the form, but not the rest of page, please, follows the steps below:
<SCRIPT>
function printForm(){
	var w = window.open(null, 'Print_Page', 'scrollbars=yes');
	jQuery('#fbuilder input').each(function () {
		var e = jQuery(this);
		e.text(e.val()).attr('value', e.val());
		if (e.hasClass('large'))
			e.css('width', '100%');
		if (typeof e.prop('checked') != 'undefined')
			e.attr('CHECKED', e.prop('checked'));
	});
	var html = jQuery('#fbuilder').html();
	jQuery('#fbuilder TEXTAREA').each(function () {
		var e = jQuery(this).parent().html();
		html = html.replace(e, jQuery(this).val());
	});
	jQuery('#fbuilder SELECT').each(function () {
		var e = jQuery(this).parent().html();
		html = html.replace(e, jQuery(this).find('option:selected')[0].text);
	});
	w.document.write(html);
	w.document.close();
	w.print();
}
</SCRIPT>
printForm();